PayloadCMS from Scratch #2 - Collections and Globals
Author
Adrian Maj
Date published

The previous post showed how to create a project in Payload and what different configuration elements are for. Now we'll look at two key elements: collections and globals. Although they may seem similar, they serve different functions in the application. Collections enable managing records with the same structure, while globals stores unique information accessible throughout the application. Understanding these differences and skillfully building structures is crucial for creating effective, scalable, user-friendly applications.
In this post, we'll create our first collection and discuss best practices for collections and globals. This will help you better understand how to effectively structure data in Payload to make the admin panel as clear and simple to use as possible.
Basic Collections
By default, every newly created project (including the one created in the previous post) contains a collections folder with two predefined collections:
Media- A special collection of typeupload, used for storing image files. To create your own collection for storing files, just add theupload: trueproperty to its configuration. After adding it, you'll be able to store and reference these files in other collections using fields of typeupload(more on this later in the article).
💡 Tip: If you want to modify the default configuration of theuploadcollection, for example by limiting file types to photos or documents, you can pass a configuration object instead oftrue. You can find available configuration options here.Users- The default users collection, distinguished by built-in authorization handling. To create a users' collection, add theauth: trueproperty to its configuration. This automatically adds fields for email address and password, so you don't need to define them manually. Most applications will have at least two collections of this type, e.g., for administrators and regular users.
💡 Tip: Similar touploadcollections, in authorization collections, theauthproperty can also be overwritten with a configuration object. You can read more about this in the documentation.
Now that you know how special collections differ, it's time to create your first standard collection, designed to store data other than files and users.
Creating a Collection
Based on the current file structure, we'll create a new collection file. For the purposes of this tutorial, we'll create a Posts collection that will store blog posts. In the collections folder, we create a Posts.ts file and place the base collection configuration object in it, as shown below.
1import type { CollectionConfig } from 'payload'23export const Posts: CollectionConfig = {4 slug: 'posts',5 access: {6 read: () => true,7 },8 fields: [9 {10 name: 'title',11 type: 'text',12 required: true,13 },14 ],15}
To make the collection visible in the admin panel and generate its types, you need to add it to the payload.config.ts file. However, before we do that, let's discuss the structure of the created collection.
CollectionConfig- a general collection configuration type provided by Payload. It ensures that our collection will be created correctly and that all fields and configuration options will have appropriate types. This helps avoid type errors, ensuring consistency in the collection structure.slug- a unique, URL-friendly collection identifier used for all references to the given collection. It's used to generate URLs (e.g., endpoints in REST API), so it should be short, understandable, and safe in the context of URLs.access- an object defining access rights to CRUD operations; each function acceptsreqanddata, allowing implementation of custom logic, e.g., restricting access to specific users. If the function returns true, access will be granted; otherwise, the operation will end with an error. You can read more about access rights in the documentation.fields- an array containing all collection fields; they can be defined directly in the array (like thetitlefield) or in a separate file, placing only the field reference in the array.
Currently, the collection only has a title, which isn't entirely consistent with the concept of a blog post. Each post should also have content, which is missing here. Let's add a field for post content - we'll use the richText field type, which allows adding longer text and formatting it. richText also offers many other interesting functionalities, which we'll discuss in a separate post, since the topic is very extensive. You can find more information in the documentation.
1fields: [2 {3 name: 'title',4 type: 'text',5 required: true,6 },7 {8 name: 'content',9 type: 'richText',10 required: true,11 },12]
Now the collection seems complete, so we can add it to the global config. We go to the payload.config.ts file and look for the collections array - currently, it should contain 2 elements - Users and Media. In the same way, we place our created collection in the configuration file:
1// payload.config.ts23// ...previous imports4import { Posts } from './collections/Posts'56export default buildConfig({7 collections: [Users, Media, Posts],8 // ...rest of config9})
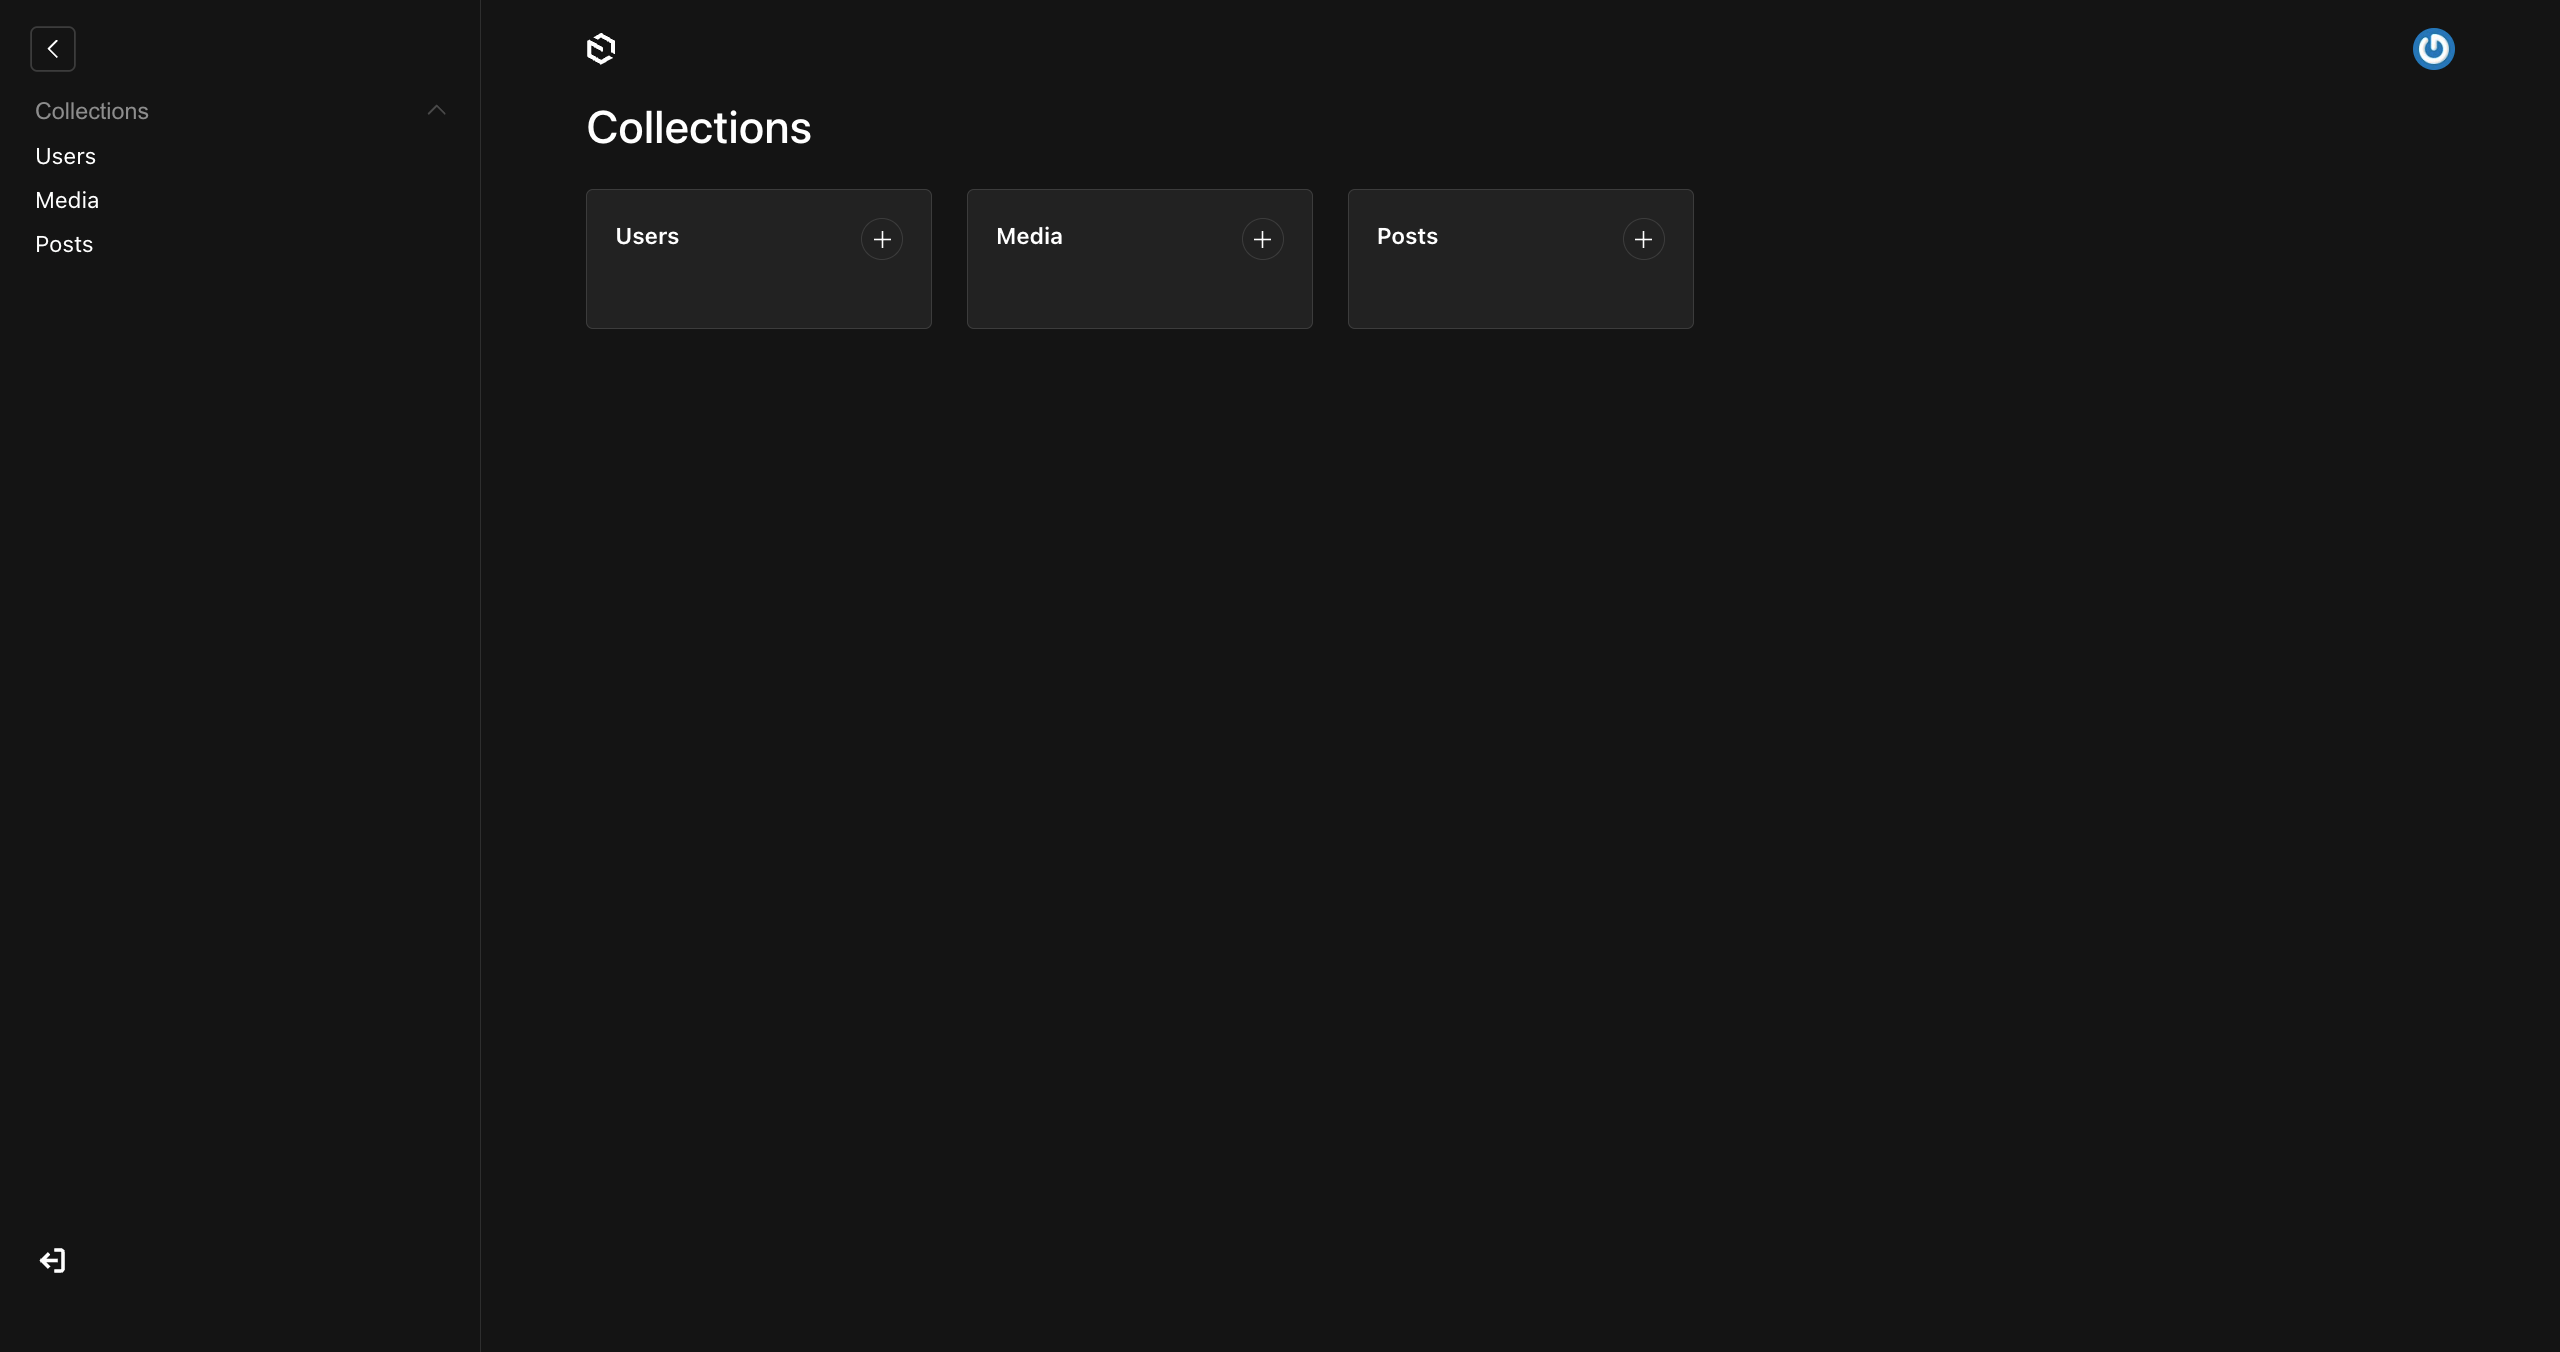
Our collection might be ready, let's check if it appears in the admin panel, which is accessible at the /admin path. After logging in, we can see that our Posts collection is now also present in the Collections group.
💡 Tip: If you haven't created your first panel user yet, you'll be prompted to do so on your first visit.
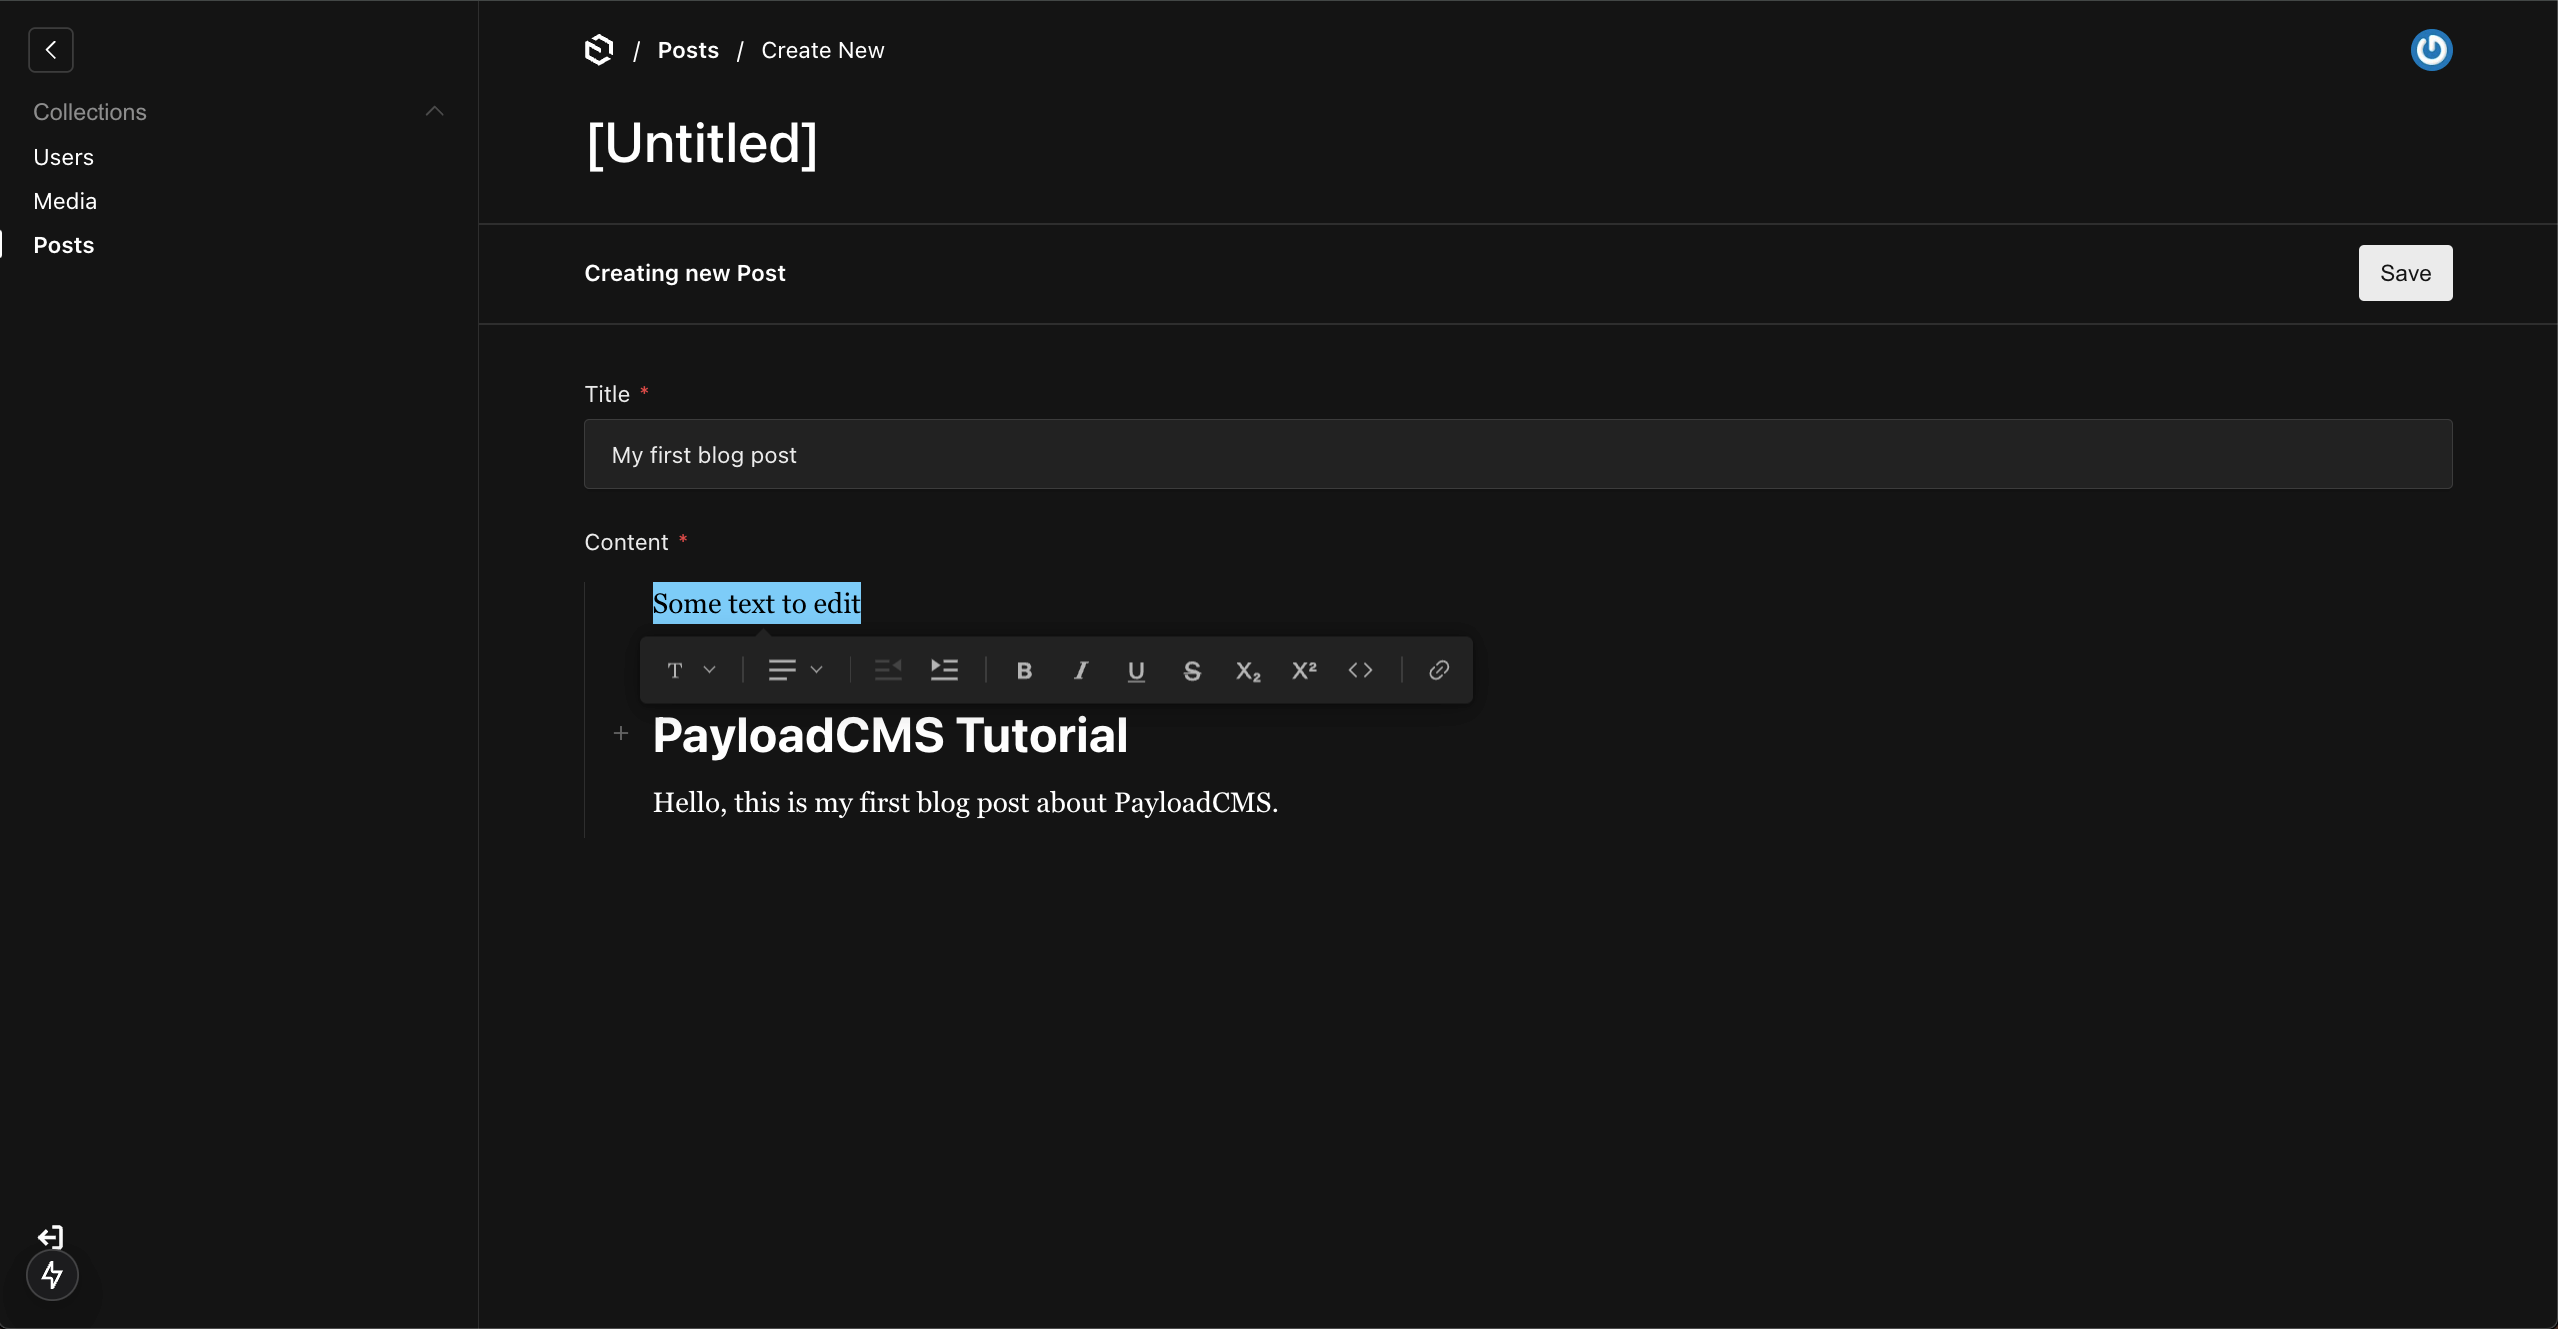
When you go to the collection view, you can create a new record. At this point, you should see two fields that we defined earlier – Title and Content. The Title field is a regular text input, while Content is a field with an intuitive text editor that allows formatting and content customization. When you select a text fragment, a menu will appear with basic editing options such as bold, italic, text style changes, etc.
💡 Tip: If you don't see the Content field, or have any other issues, run the pnpm generate:importmap command in the terminal. This command refreshes the src/app/(payload)/admin/importMap.js file that is used internally by Payload; currently, it's not always refreshed automatically and sometimes needs to be done manually.
After filling in the content, we can save our record and then use it, for example, to render a blog post page by fetching data from the collection via API. We'll discuss creating pages based on collections in detail in upcoming posts.
Globals
Unlike collections, which can contain multiple records, globals stores only one instance of data. It works similarly to a collection with a single record, but instead of an array, the API returns an object directly. This approach works great for defining configuration options and application settings. A footer is a good example – instead of creating a Footers collection with a single record, it's better to create Footer as globals.
💡 Tip: It's a good practice to place global settings files in a separate folder, like src/globals, to maintain consistency and order.
When it comes to creating global structures, the procedure is almost identical to collections, with the only difference being the type - instead of CollectionConfig, we'll use the GlobalConfig type. Below is an example structure for Footer with a logo selection option (there's also an example of the upload field type that we mentioned earlier):
1import { GlobalConfig } from 'payload'23export const Footer: GlobalConfig = {4 slug: 'footer',5 access: {6 read: () => true,7 },8 fields: [9 {10 name: 'logo',11 type: 'upload',12 relationTo: 'media',13 },14 ],15}
Now, similar to collections, we add a reference to the global in the payload.config.ts file. We place the reference not in the collections array, but in globals which doesn't exist by default - we need to create a globals key and set its value as an array with references to globals.
1// payload.config.ts23// ...previous imports4import { Posts } from './collections/Posts'5import { Footer } from './globals/Footer'67export default buildConfig({8 collections: [Users, Media, Posts],9 globals: [Footer],10 // ...rest of config11})
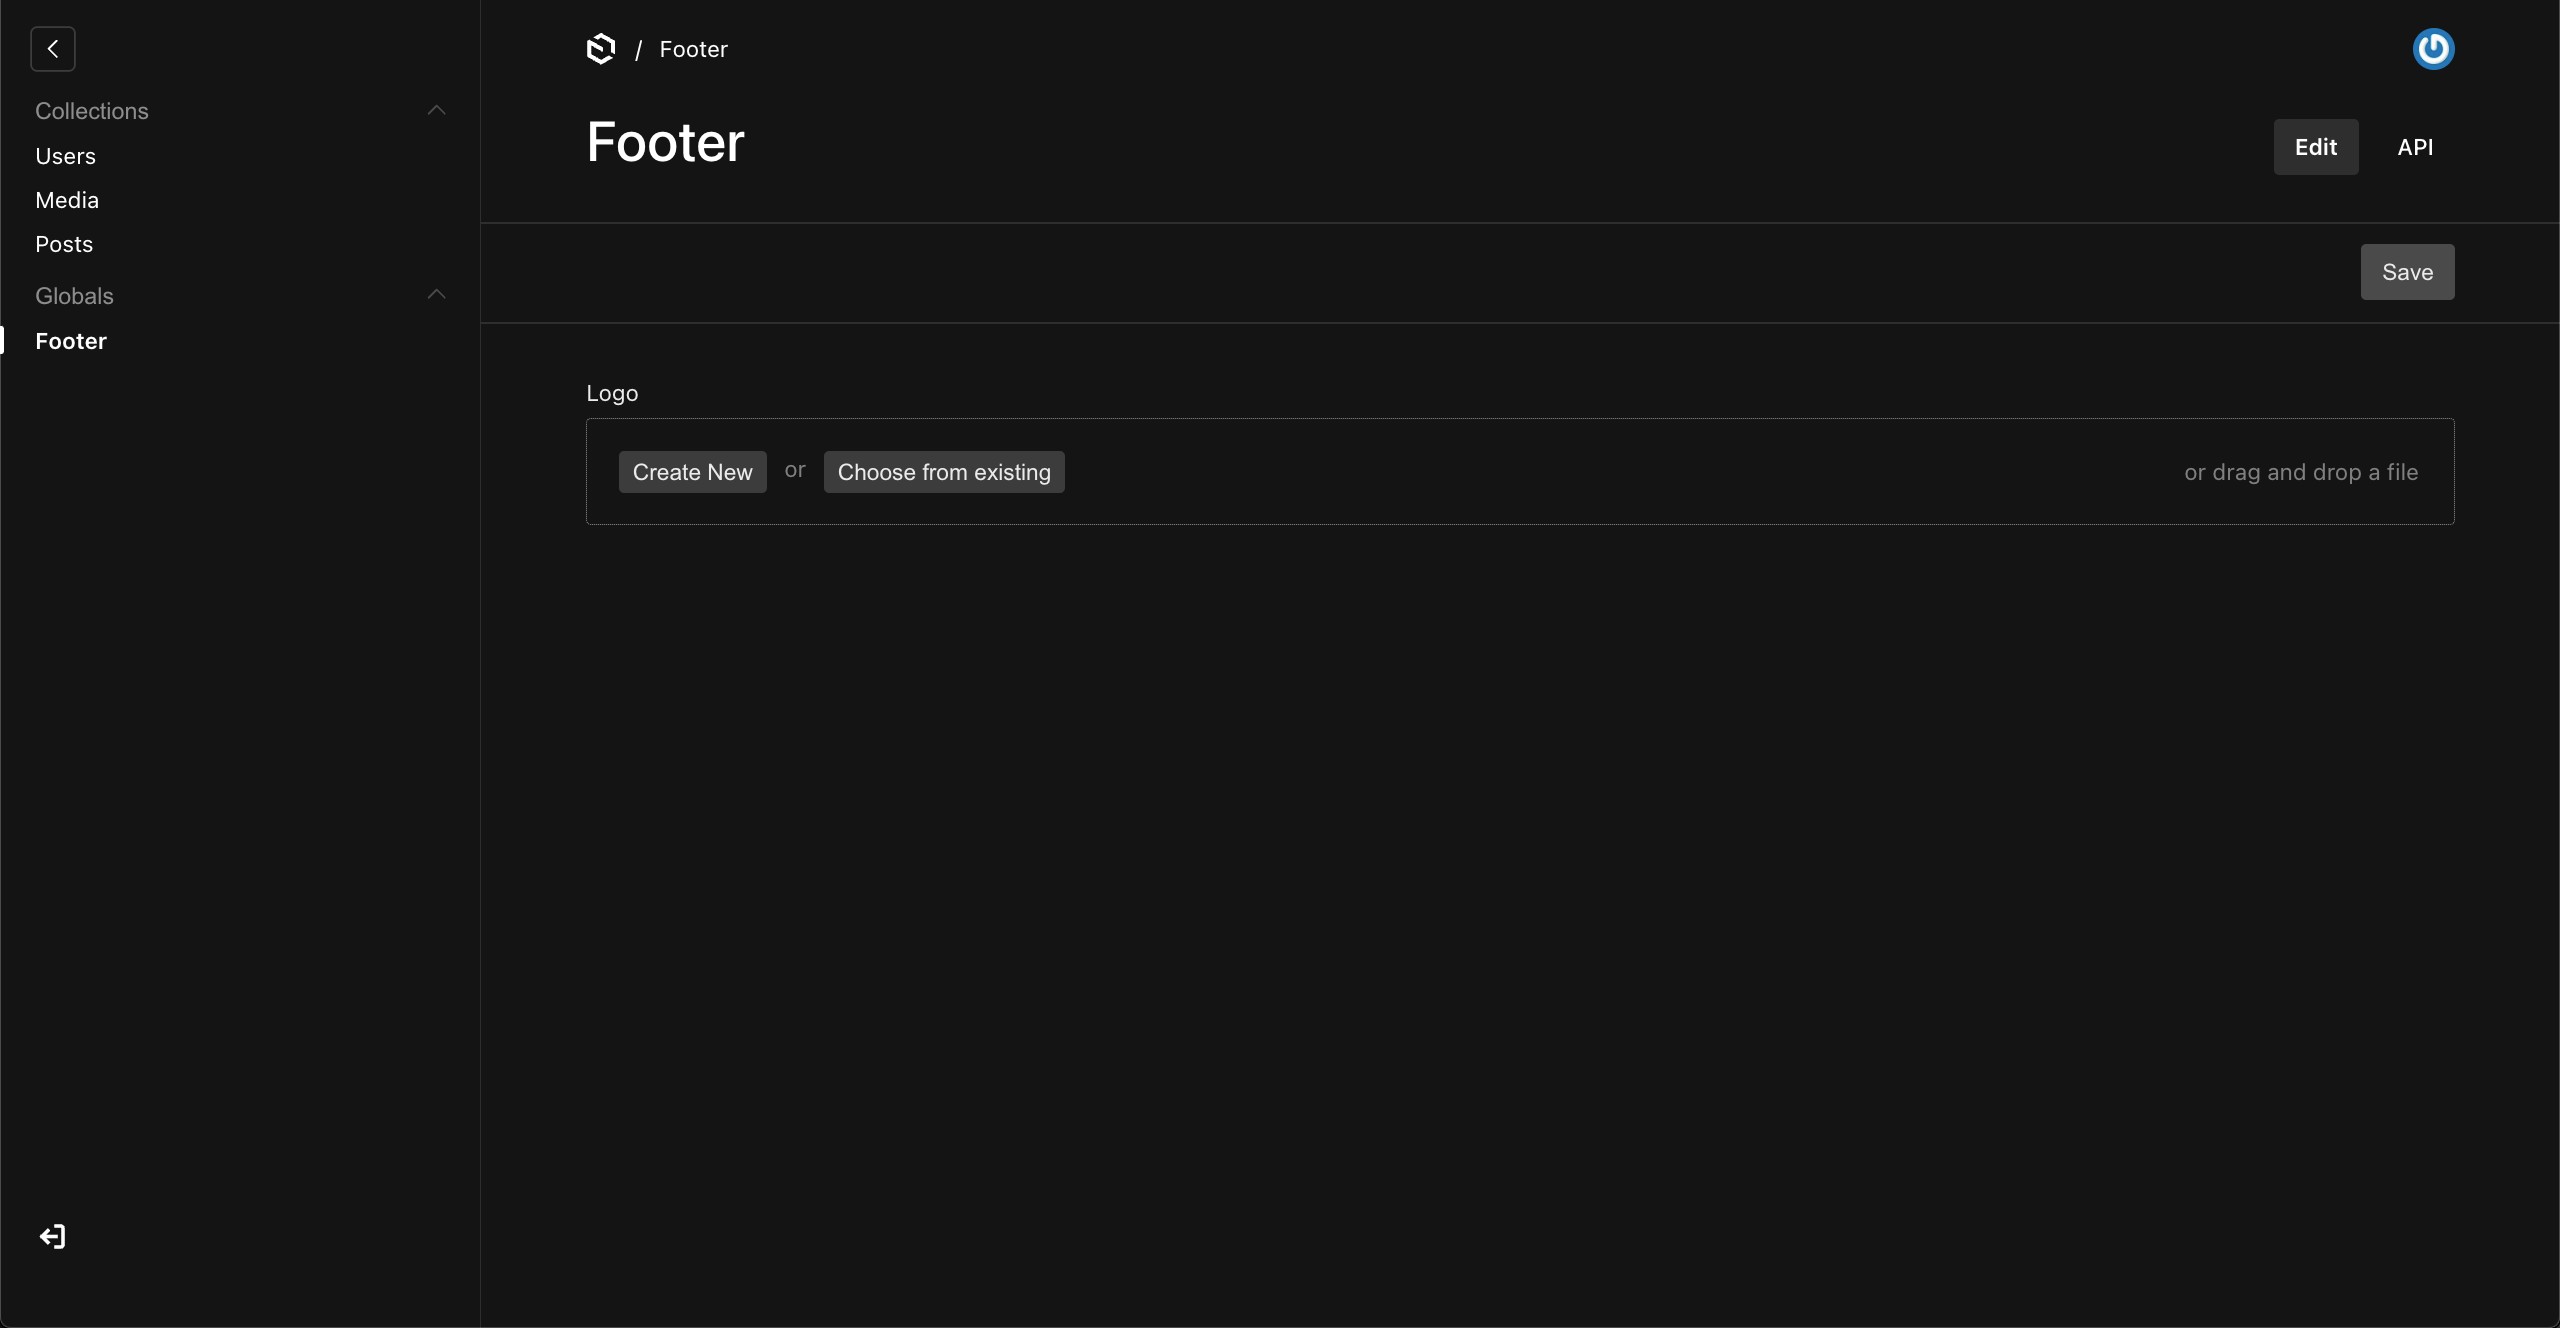
In the admin panel, under the Globals group, Footer should appear. If it doesn't, use the pnpm generate:importmap command. When entering the global, instead of the record list present in collections, we immediately see a "single record" view, which contains the Logo field type where we can upload any image and then use it when building the footer component.
💡 Tip: Globals doesn't change very often in most cases, so caching this data would be a good practice. A separate article will be dedicated to caching in Payload, although for now you can see an implementation example in the Payload Website Template.
Summary
Collections and globals form the foundation of every Payload-based application. Their proper configuration is crucial for the application to function correctly and maintain code readability. Thanks to this article, you've learned about their basic capabilities and best practices in creating them. With your current knowledge, supplemented by Payload documentation, you should be able to create and manage collections according to your needs.
In upcoming articles, we'll discuss the topic of users and access management in more detail. In the future, there will also be posts about field/collection hooks, which allow adding custom logic to collections, as well as an article about Custom Fields and their practical application in Payload.
If you want to continue learning and explore PayloadCMS further, I encourage you to follow my blog. Additionally, on my social media profiles, I'll be sharing information about new posts and updates related to Payload. You can find the source code from each post on my GitHub.
Learn how to create a new project in Payload and discover best practices for configuration that will help you take full advantage of its capabilities.
Learn how to manage users and define access control to data in PayloadCMS. Explore different types of users and leverage their potential.